How To Minimize Image Size Without Damaging Picture Quality
How To Minimize Image Size Without Damaging Picture Quality
The size of the image is very influential and even very influential in some ways, such as when registering to an online forum, usually limiting the size of the image is a maximum of 100kb, but in blogging is also the size of the image is very influential with page-speed. But you ever try to minimize the image, the result is the image is damaged alias blur. Relax, this time I will give you how to Reduce Image Size without Destructing Picture Quality, you may be confused how to reduce the image without damaging the quality.
Before I discuss further, here I will give two methods to minimize the image size, the first method by using CMD from windows and the 2nd is by using the help of Adobe Photoshop. For all readers who "like" with something instant, it is advisable to use the first method, that is by using CMD why? because this method is very fast, even the process is less than 5 minutes besides that this method does not damage the image quality (although only a little).OK lets check this out:
Before I discuss further, here I will give two methods to minimize the image size, the first method by using CMD from windows and the 2nd is by using the help of Adobe Photoshop. For all readers who "like" with something instant, it is advisable to use the first method, that is by using CMD why? because this method is very fast, even the process is less than 5 minutes besides that this method does not damage the image quality (although only a little).OK lets check this out:
* first method *
1. Using CMD.
- First download the first JJG script file. (in the form of .rar)
- After that extract the downloaded file.
- Then move the image file (must be .jpg) into the JPG script folder as shown.

- After that drag and drop (drag and drop) the image file, into the file "ScriptJPG.cmd" as in the picture.

- Then the CMD window will appear as shown.
Here you can choose, what percentage of quality is left, meaning the results of the image after completion in minimize. For example: the original image [100%] is smaller [2] 95%, so the image is only 5% smaller, and so on.

- Then wait for the process, just take a long time.

- When finished, the image will be automatically stacked by the image just finished processing, as in the picture.

* first method completed *
* second method *
2. Using Adobe Photoshop.
- For free adobe photoshop application using any version, please search google: D
- Open the photoshop app, preview the image size by going through " properties "

- Recall the initial size, we will compare it alone.
- Ok just open photoshop, then press the combination key [ctrl + shift + alt + s] simultaneously.

-
Then the new window will appear as in the picture, there you can choose
the image quality, the smaller the image size the reduced image
quality.
Description: number 1: original size; number 2: smaller (95%); number 3: medium; number 4: the size of the image is very small even to reduce image quality.
[please select as needed]

- Once done you can directly save it.

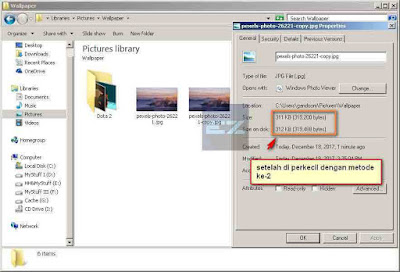
- Compare its size, with its original size.

* second method completed *
*closing*
How to Reduce Image Size Without Destructing Image Quality
I hope that what I have given is useful for all readers, apologize if
there is a mistake in the article I have written, I as the author really
expect the advice of readers as well, that way I can fix it and can
make the article more useful and better. That's all and thank you.
-EZ-


Post a Comment
Post a Comment